We're glad you made it here. If you are interested in upgrading or starting a new B2B store, then you've come to the right place!
This document describes many business features that are built-in to AbleCommerce. If you'd like to follow along in your own store, then sign-up for a free 14-day hosted demo. (All we need is a valid email address - it takes 3 minutes)
Let’s start with the higher-level functions of a business to business ecommerce store. Before beginning, you might want to get logged in to the Merchant Administration for AbleCommerce. If you just want to read through the document, we’ve provided screenshots from the example configurations showing several B2B features.
Login to the AbleCommerce Merchant Menu
For those that are planning to follow along with their existing demo, dev, or live store.
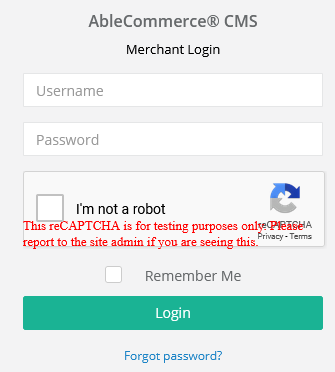
Configuring an eCommerce store for group memberships -
Groups are simply one of the most powerful ecommerce features you can have that will allow you to offer custom taxes, custom payments, custom shipments, membership purchases, member discounts, member coupons, subscription memberships, and lots more!
If you need a B2B store with product or purchase restrictions, this first configuration setting could apply to both B2B and B2C online stores. Groups are commonly used with subscriptions and member stores (require a user to login before viewing the store). You can set groups to allow or restrict viewing of categories, products, and even content pages. Most often though, groups are used to offer special features, pricing, payment and shipping options, etc.
First, let's take a look at how groups can be applied at a global store level. This first section demonstrates how to restrict access to the storefront using member group(s). This part is optional of course and would only be necessary if you want to create a member-only storefront.
To Configure Groups for a Members-Only Storefront
- Find the Configure menu from the left-column navigation pane and slide open to show the sub-menu items.
- Click on the General menu item to view several global configuration options for the store.
The Configure Store page has several configuration sections and any settings changed here will affect the store globally.
In the top-left section named Store Settings there is an Access Restriction setting. Before making any changes, take a look at the options available.
- None
- Registered Users only
- Authorized Groups only (this is the membership option we'll be looking at in this document)
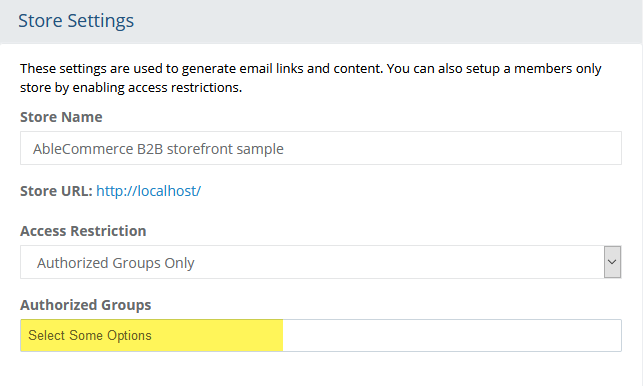
It’s important to understand how these settings function, because it determines how your other member features within the application react to what’s going on here. For this example, we are going to setup a B2B store with member groups because it offers the most flexibility and feature integration. Let's take a closer look at each of the Access Restriction options available, just so you know some basic differences.
- Authorized Groups Only - If your B2B store requires a customer to be pre-approved and logged in to purchase, then you will want to select the Authorized Groups only option. This is the most common B2B storefront type (and the one we will be demonstrating in the sections that follow!)
- Registered Users Only - If you want to disallow unregistered users (anonymous/guest) from using the storefront, then this is the best option to select here. This type of B2B store might want to provide a member registration form that can be submitted for approval and access.
- None - The 'None' option simply means that the store is not operating as a B2B, or with memberships, and can be viewed by any user or search bot.
There are many other B2B configuration settings for visibility, discounts, pricing, notifications, etc., but before any of that can happen, we need to setup some customer groups.
For now, let's leave the configuration section so we can create some groups. Towards the end, we'll swing back around here to show you how to apply groups for a members-only storefront.
How to create Member Groups in my B2B store
Before creating your groups, you need to primarily think about group price levels in your B2B store, or if there are any specific member features that you need to offer your customers (e.g. purchase order payment methods). Using different price levels is optional of course, so maybe instead you want to offer discount levels. Either way, create groups for your business customers that make sense for how you plan to sell to your business customers.
If you’re ready to begin, then complete each section below using your own naming conventions.
- Make sure you are logged in to the AbleCommerce Merchant Menu
- Using the left menu, go to the People > Users > User Groups page.
- Using the button in the upper-right corner, press Add User Group
- A popup form appears with a field for Group Name.
- We are going to use some generic terms for this example (e.g. Level 1, Level 2, and Level 3). Group names can be changed at anytime.
- The screenshot below shows a few groups. Notice the User count is 0 for each new group.

Before we can add users to this group, we need to get some new customers on board. If you already have a working store with users, you can click on the counter icon show for each record in the Users column. This will bring up a page where you can find and assign user records to the selected group.
To create new customers, go to the People > Manage Users menu item from the left column. This brings up the User Manager – a simple or advanced search page to find all the user records in your store. It is the pathway to edit your user records, add or change group assignments, and many other customer features.
In the upper-right corner of the page, click the Add User button.
When the popup appears, enter an email address. It must be unique and belong to a single person who can login using their own secure password. For the password, enter something you can communicate to the customer, but also keep the box checked next to "User must change password at next login" so the password will be forcibly changed on the customer's first login.
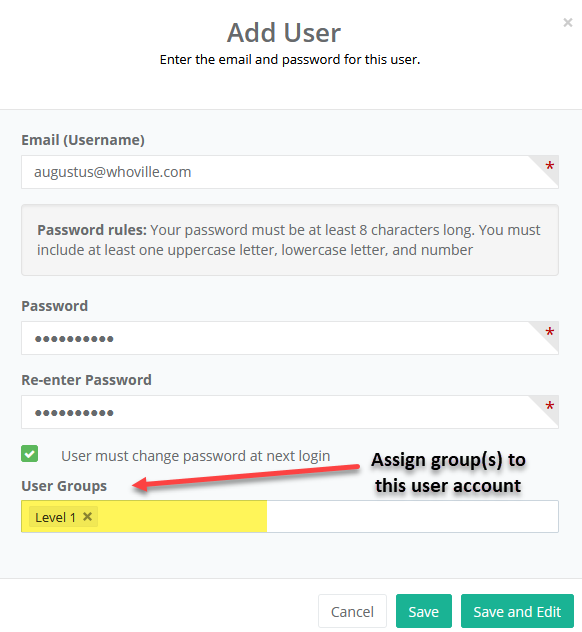
At the bottom of the form, you can select a User Group for the new record.
Press the Save and Edit button when finished.
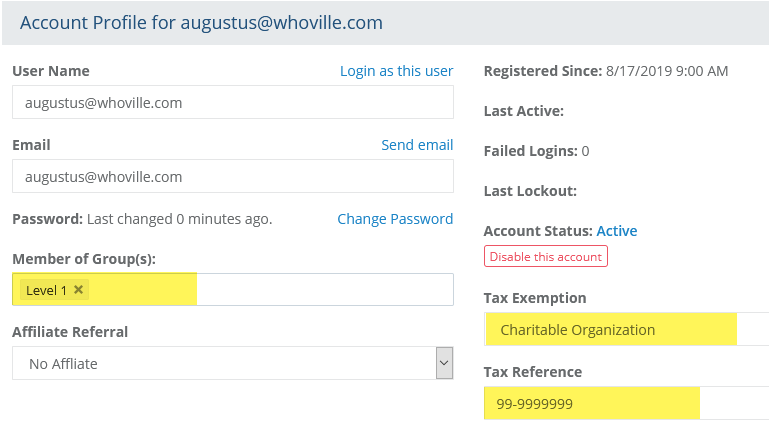
The Tax Exemption selection determines if the member of the organization will be exempt from taxes, and the Reference field is there to record essential information needed for tax purposes.
Let’s go ahead and press the Save and Close button at the bottom of the page.
A little tip. If you ever want to test a user’s account, then press the Login as… button from the User Management page. This will launch the retail storefront as if you were that user browsing around. You will be able to see exactly what they would see. This is a good way to test a new B2B store that uses memberships.

After setting up your customers, you can take advantage of many different features including digital goods fulfillment, subscriptions, autoship, special price levels, custom payment methods, and shipping options that all integrate with the member groups features in a B2B storefront.
For this example, we’re going to setup a simple B2B store that sells goods to other business for resale. The store owner will be able to manage supplies, setup inventory with low stock notifications, and send email notifications.
How to sell products from vendors using drop-ship notifications
- Make sure you are logged in to the AbleCommerce Merchant Menu
- Using the left menu, go to the People > Vendors page.
- Using the button in the upper-right corner, press Add Vendor
- A popup form appears with two fields for Vendor Name and Email.
- Save when finished.
These records are for internal use and used only for email notifications, such as when an item that the supplier provides is going to be directly shipped to the customer when sold by the storefront. A vendor is simply someone who is notified at time of sale. This feature is not only for B2B stores but also commonly used for B2C stores that need a drop shipping feature.
The screenshot below shows a few vendors. Notice the Product count is 0 for each one.

If you already have a working store with products, you can click on the counter icon show for each record in the Products column. This will bring up a page where you can find and assign product records to the selected vendor.
How to setup a product for resale in a B2B store
- Make sure you are logged in to the AbleCommerce Merchant Menu
- Using the left menu, go to the Catalog > Products page.
- Using the button in the upper-right corner, press Add Product. If you already have products created, then select one to edit.
- The minimum requirements for a product are name, price (can be $0), and an assignment to one or more categories.
- Once the product is created, proceed to the Edit screen and take a look at Basic Product Information. It should be the default view when arriving to the page.
- In the lower-right corner of this panel, there is a setting for Vendor. If you want to send this company or person email notifications when a product is sold, then select the supplier or vendor of this item here.

You and your supplier should have a written agreement that indicates how and when items will be shipped directly from their warehouse(s) to the customers’ home. You can customize your email notifications to let the customer know that a shipment will be coming directly from a separate warehouse. If you have special instructions or shipping requirements, these should be mentioned in the email, especially if a third-party will be handling fulfillment of your products or services.
How to drop-ship to your customers using the most accurate shipping rates possible
Typically, a supplier or vendor is assigned to each product in the store and they will handle fulfillment for the item(s), so the organization will immediately receive an email when an order for their item is purchased by your customer.
Getting accurate shipping rates from different locations and getting products shipped directly to the consumer will be simple. All you will need to do is create warehouses for the shipping origins of a product. (and if you were thinking these are like the vendors we just added above, then you'd be right!)
The warehouse locations are kept separate because any single vendor could still ship from different locations. (eg. furniture from WH location A and home décor from WH location B). By using a warehouse's physical address for the shipping origin, the shipping calculations at checkout will be the most accurate.
For each warehouse, a shipment will be created for the order during checkout, so the customer can choose from the types of shipping methods you wish to offer (e.g. freight, overnight, or to calculate shipping after the order is placed)
How to configure warehouses for accurate shipping rates directly from factory to consumer.
- Make sure you are logged in to the AbleCommerce Merchant Menu
- Using the left menu, go to the Configure > Shipping > Warehouses page.
- Using the button in the upper-right corner, press Add Warehouse
- A page with a standard address form appears. Complete the fields with as much information as you want to display to the customer. Just remember that the address, city, state, country, and postal code are all required elements, and these are being sent to the shipping carrier for live real-time shipping calculations.
The screenshot below shows a few warehouses including the default warehouse. Notice the Product counters for each one.
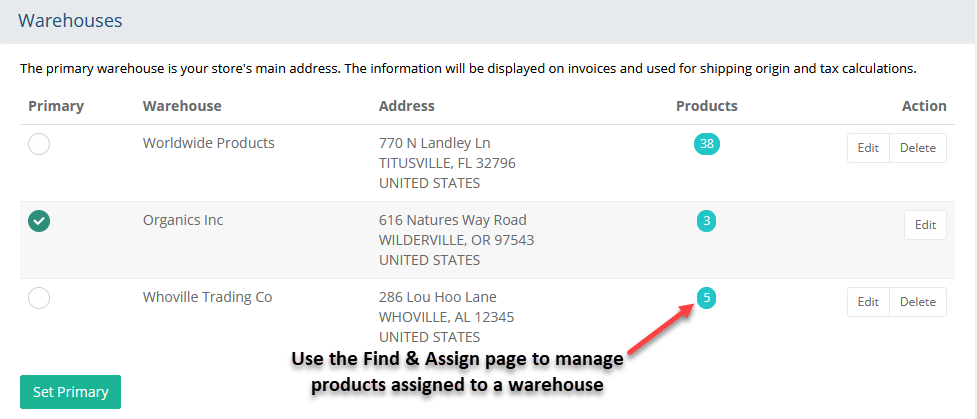
Just click the link to use the Find & Assign page where you can search for products and assign them to the selected warehouse. This feature of AbleCommerce is implemented throughout the admin management pages so any type of batch update will be easy to accomplish – saving you time and money!
If you need to create products, then continue to the section below.
How to setup a product for drop-shipping directly from the warehouse to the customer
When you start adding your products, from the Catalog or the Product Manager, you’ll be able to setup simple or advanced shipping options for each one. Products have many business-to-business features such as minimum order quantities, bulk discounts, group level pricing, inventory management for variants, one-click reorder, and bulk purchase pages.
We can explore some of the B2B eCommerce features that AbleCommerce uses by sliding open the Shipping and Tax section from the main “Product” tab on the editing page for a product.
If you need to be reminded on how to get to the product editing page, then use the left menu, and go to the Catalog > Products page. This is the Product Manager and provides an easy way to find the product you were last editing. It will appear first in the results below the search form.
So go ahead and edit a product to set the warehouse (shipping origin).
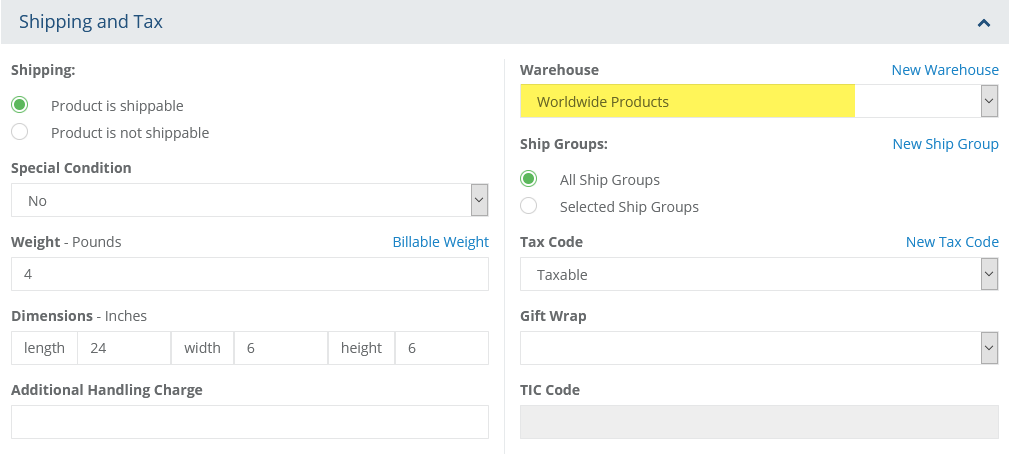
Here, you should enter some vital shipping information about the product’s physical shipping dimensions, weight, and to select the warehouse that it will be shipping from.
If an item will always ship alone, then change the special condition to 'Ship Separately'. If the product can ship with other items but, due to its irregular size, the cost to ship it is more, then you can use the special condition to 'Calc Costs Separately'. When the item is sold with other standard shipping items, then the product dimensions are sent to the carrier for the most accurate rates possible for the total shipment costs.
When finished, press the Save button in the bottom footer.
Now, the product is ready to be shipped but you’ll still need to select a shipping carrier or create custom shipping methods. These features are covered in the Merchant Guide. We have many ways to help, so see our software support page if you need assistance.
How to setup product price levels in a B2B eCommerce store using member groups
At the beginning of this page, remember one of the first steps was to create member groups and assign your customers to them. Now it’s time to see the member groups feature in action.
Let’s take another look at the product editing page. At the top, in the row of tabs, find “Specials” and click it to show the special pricing setup page. Press the Add Special Price button to view a popup form.
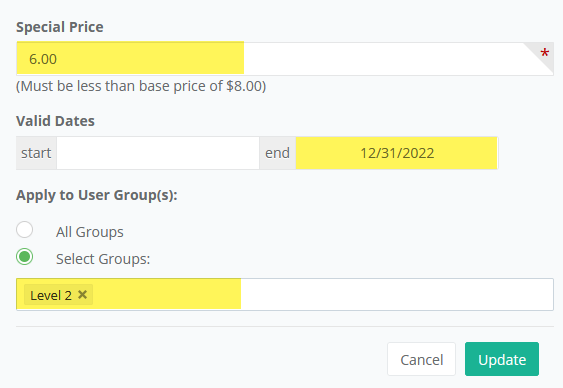
Notice how the base product price can be altered, and by assigning this “special” price to groups, you form price levels based on the group membership.
You can also put in an end date (which might represent the end contract date with your customer). For no end date, just leave the field blank. Add as many price levels as needed and assign to groups if you want the price to be available only to members of that pricing group.

Now everything is set and you are ready to take a look at the product. To test, you will need to make sure the account your testing with is in one of the groups with special pricing. To do that, just assign your own record to one of the users that you plan to test (remember we covered this above). Then view the storefront and find the product that has the special member pricing. You should see only the price that has been assigned to the group you are testing with.

The final result is a product that will display membership pricing when the user is logged in to the store.
How To Customize Labels on the Product Page
Logout from your test account and log back in as an admin user, then you should see the design tab that runs alongside the right side of the browser. Turn ON design mode to see if there is anything you might want to change about the page.
Maybe you want to change the label text for the price line. To do that, just click into the highlighted area to open a popup dialog with the text that can be changed. Go ahead and make it say whatever you want and save to close.
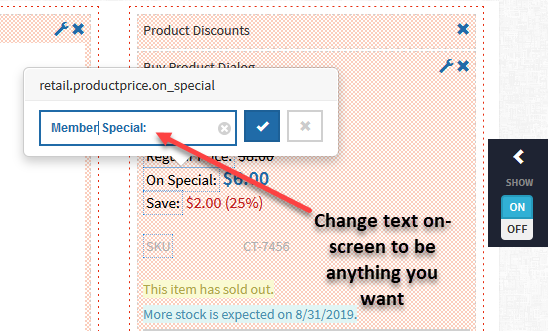
Turn design mode OFF to view the page normally.
How to Create Member Discounts and apply them to the products I sell in my online store
Another way to offer pricing to your customers is by using the Member Discount feature. An online B2B business may want to offer volume discounts. The discounts can be offered through member groups or without. If you want to set a minimum purchase quantity, you can do that too.
Discounts are one of the most flexible features of AbleCommerce. You can apply them globally throughout the store and at a category level, where the discount trickles down to all lower level products. You can also apply the discount at the product level which will override any higher-level assigned discounts.
Discounts can be based on quantity purchased or total price (amount) ordered of an item. If Discounts are assigned to any user groups, then only those members will be able to view and receive the discount. Unlike coupons, discounts are automatically applied to the order when items are added to the cart.
- Make sure you are logged in to the AbleCommerce Merchant Menu
- Using the left menu, go to the Marketing > Discounts > page.
- Press the Add Discount button in the upper-right corner.
- Create the initial discount type, which is either based on the quantity purchased or the amount purchased.
- Then setup the discount levels accordingly. Take a look at the configuration section for this volume discount.

After setting up the configuration and type of discount, you can create the pricing levels and discount amounts for each. When finished, save the discount.
Once the discount is saved, you can assign it to categories or individual products, or just set the discount globally for all products in the store. Here is an example of a quantity discount.

Let’s take a look at the storefront side and look at how this discount matrix displays on the page. The discount is being output by a widget named “Product Discounts” and its location can be easily moved on the page. Turn ON design mode again.
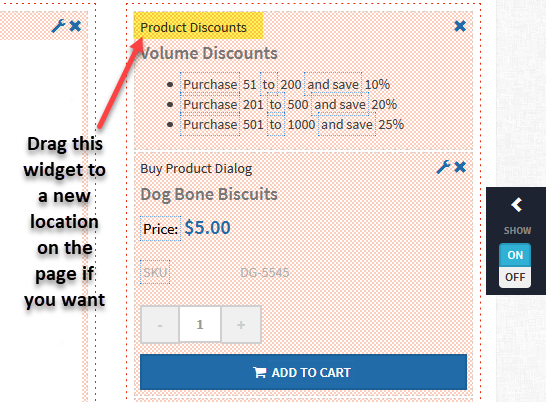
If you want to change the location of the discount widget, drag the widget by holding down your mouse to move the widget to a new location. Then release the widget and it should drop into the new location.
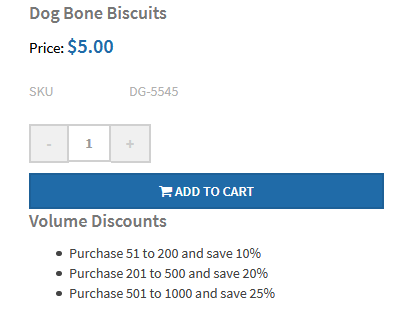
Now SAVE and turn off design mode to view the discount (now below the Add to Cart button). If you want to change the name of the discount, then you can return to the configuration screen and customize it there.
Although it is also possible to create custom coupons and apply them to member groups, it is not going to be part of this document on setting up a B2B store. If you want to look at the coupon feature, then go to Marketing > Coupons page using the menu. You can setup 3 different types of coupons applicable for orders, products, or shipping. Each one offers many variations and customizable settings that can also be used with group memberships.
As the final steps in configuring your B2B online marketplace, you will need to setup payments and shipping. If you are going to take payments by purchase order, then it’s easy to setup a method for this purpose and you can assign it to member groups if you want to.
Another popular feature for B2B stores is to have the ability to create custom orders on behalf of your customers using an account, PO, or the defer payment option. Then send an invoice and let your customers securely login to the Account page and pay online.

After the order is placed, one of the most powerful features that the AbleCommerce eCommerce platform has is the ability to modify orders and add custom shipping, credits, or other costs that might be associated to the order.
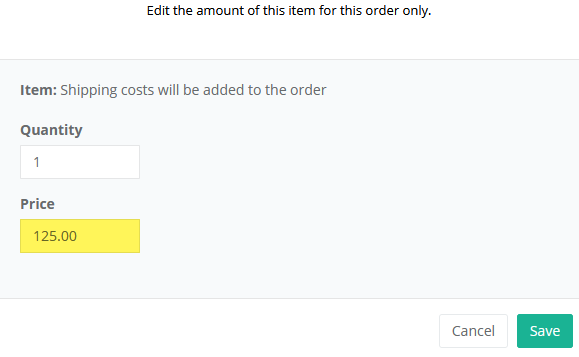
The example below shows how you can enter a custom shipping charge to an order. For a B2B store, it is common to see custom order changes and adjustments to payments, shipping, discounts, taxes, etc.
Once the order is finalized, an invoice can be emailed to the customer with the terms of payment. The customer can return to their order and make the payment when it is due. Another nice feature that you can turn on is the ability to allow a customer to make multiple payments towards an invoice or balance due. This can be a very useful feature for service B2B storefronts who might want their customers to make periodic payments or deposits towards future work.

If you prefer to take credit card payments over the phone, then you can do that as well by using a built-in payment form available from any order.
How to Use Inventory Tracking and Control
The last thing we will cover is inventory management. This feature is included in all versions of AbleCommerce and covers advanced inventory features such as low-stock notifications, re-stock management, tracking at the product level or inventory control for variants, backorders, availability, and restock notifications for customers.
In this screenshot, tracking is enabled for the base product. The number of items in stock is 125, which is getting very close to the low-stock threshold set for this item.

Let’s see what happens when an order is placed by a customer. If the order contains 30 of the items shown above, then that will reduce the in stock level from 125 to 95. Since the item has a low stock level of 100, the order will also trigger the low-stock level warning notification. Not until the order is paid, do the stock levels adjust. You can, however, customize events, such as inventory adjustments and email notification(s) - giving you more control over updates (triggers) and when they take place.
How to Create Custom Workflows and Setup Email Notifications
In AbleCommerce, there are many different types of pre-built emails that can be customized, and you can also decide when the email should be sent (its trigger). In the sample B2B setup that is described here, we have a product that is using the “Vendor email notification” and it also has inventory management enabled with a low stock value set.
An order is placed triggering the low-stock event. When the order is fully paid, then 3 email notifications will be sent:
- Order Invoice email goes to the customer
- Packing slip (shipping address only) goes to vendor
- Low stock inventory notifications go to merchant
You can customize any of the email notifications, and decide when you want to send them and who you want to send them to. All of the email templates and triggers will be setup during installation of the software, so just know that is is totally possible to create a custom business workflow.
Which brings up the last of the necessary features, and that is a storefront which allows a merchant to completely customize the order fulfillment process and create their own workflow process by using the custom order status feature.
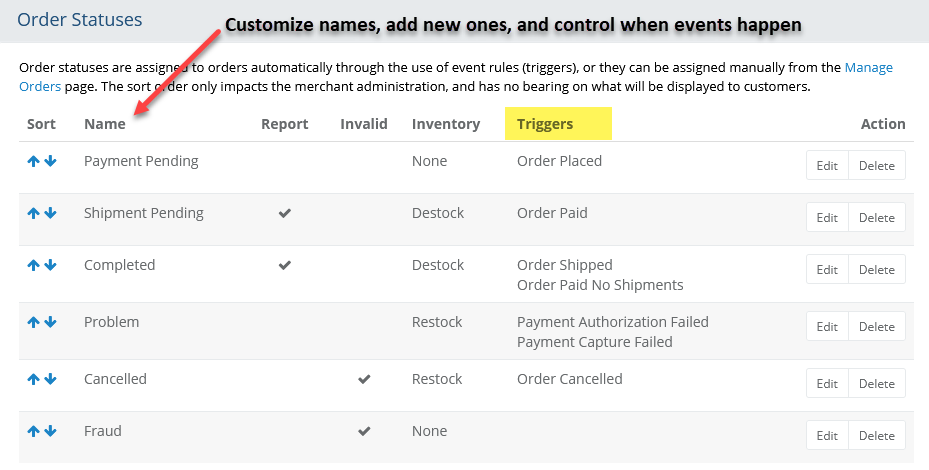
By creating new order statuses, you can use them along with email notifications to customize a workflow to process orders.
How to Setup an eCommerce store with user memberships (a members-only store)
If we circle back around to the beginning of this document, you may remember we briefly mentioned access restriction at the store level. This is a setting from the Configure > Store > General Settings page.
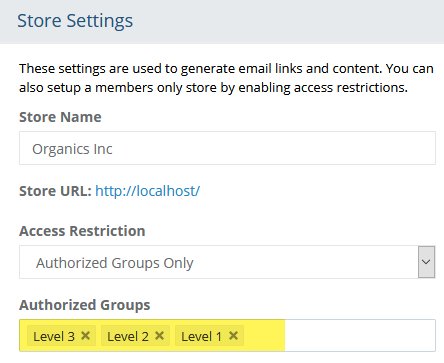
When you restrict access to your store by using member groups, then only the users belonging to the groups selected will be able to access the site. This type of access generally requires that you pre-approve users before they are allowed to purchase from your store.
Also, keep in mind that member groups can be assigned to many different things within the store, such as products, coupons, subscriptions, digital goods, payment methods, shipping methods, taxes, and all the group features covered above. Groups can also be used to show only certain products or content through memberships.
Groups are a powerful feature in a B2B store and can be used in a variety of circumstances.
###
If you are thinking of upgrading or starting a new B2B store, consider using AbleCommerce which is a full-featured eCommerce and CMS application that allows you to create and customize product catalogs and content (blogs) using a responsive website design. No experience with HTML, CSS, or coding is needed. Literally anyone can build an online store and manage content using our secure eCommerce system.
Invented over 25 years ago, AbleCommerce has evolved into a stable and secure platform under Asp.Net with MVC, combined with a business-friendly, user-friendly, and mobile-friendly online administration. You can download now and self-host, or use one of the application hosting providers we recommend.
Oh...and did we mention AbleCommerce® is free eCommerce software!? Learn more about the AbleCommerce Startup version here.

